Saturday 24 March 2012

New Blog!

So our new blog is officially up and Kristin has already shared her first project, so check it out!

http://brilliantlikefireflies.blogspot.ca/


Photobucket

Tuesday 20 March 2012

Moving...

Just an update, I won't be posting anything more on this blog as I will be joining my sister on our new blog very soon! I will re-direct you to the new blog as soon as it is up and running.

Stay tuned!

Wednesday 14 March 2012

Blue Mason Jar

Yesterday I decided to tackle a project that I've been wanting to do but for some reason I thought it would be harder than it actually was so I kept putting it off. Pinterest provided me with a lot of inspiration and examples for diy-ing my own blue tinted mason jars, but the one I eventually went with was on the Craftberry Bush blog, here:

http://craftberrybush.blogspot.com/2011/03/mason-blue-glass-canning-jar-diy.html

So, since I already had an old mason jar laying around, and some modge-podge (and glue) all I needed to get was some blue food colouring.


While on the example she carefully measured out the amount of modge podge/glue and food colouring, I just eyed it. First I tried to use the method of pouring the modge podge and food colouring mixture into the jar and shaking it to cover all of the inside.


Unfortunately the modge podge seemed to be too thick or something so it didn't drip out easily and too much stuck to the surface. So I washed it out and started again, this time using a the mixture of glue and food colouring to paint on the outside of the jar. It turned out pretty streaky, but since on the directions she said it would dry I let it sit. And what do you know, it did!


I think it turned out pretty well, but since it isn't a permanent way to tint the jar blue maybe next time I'll try another way with special glass paint.

This post was linked on the Pinterest Challenge on Young House Love, check it out here

Monday 12 March 2012

Individual Sweet Potato Shepherd's Pie


When I got a set of ramekins for Christmas this was the first recipe I chose to make in them. They're a great alternative from Shepherd's Pie and the fact that they are individual make them a little extra special. I believe it is a recipe from a Kraft magazine that was delivered to my house.

  • Ingredients

    1 large sweet potato, cut into 2-inch pieces

  • 2 tbsp. herb & garlic cream cheese spread

  • 1/2 lb. ground beef

  • 1 cup sliced mushrooms

  • 1 green onion, chopped

  • 2 tbsp. sun-dried tomato & oregano dressing

  • 2 tsp. flour

  • 1/4 cup water

  • 1 cup frozen green beans

  • Heat oven to 375 F.

  • Microwave pototoes in bowl on high for 4 minutes, or until tender. Mash until smooth. Add cream cheese and mix well.

  • Brown meat with mushrooms and onions in dressing, drain. Mix flour and water. Add to meat mixture, cook for 2 mintues. Stir in beans; spoon into 2 (2-cup) ramekins sprayed with cooking spray. Cover with mashed potatoes.

  • Bake 15 minutes, or until heated through.


  • I linked this post to Made by you Monday on Skip to My Lou, Mix it up Monday on Flour Me With Love and Tuesday Talent Show on Chef in Training

    Skip To My Lou
    Mixitup

Wednesday 7 March 2012

Alfredo Chicken

Here's a really simple crockpot meal that is beyond delicious in my opinion.

Ingredients
6 chicken breasts
1 jar Alfredo sauce
4 tbsp pesto sauce

Mix all three together in crockpot. Cook on high for 4 to 6 hours. Serve over rice.


Enjoy!

Picture Hangin' Time


Quite a while ago I bought some pictures from the etsy shop, Little Brown Pen, the yellow postcard collection. My plan was to buy the same Ikea frames that they showed the photos in on their site and hang them in my living room. But time passed and I never got the opportunity to go Ikea (the nearest one to where I live is about an hour and fifteen minute drive away) until recently.

There are nine photos in the collection but for right now I bought four frames. I decided to hang them above my bookcase which looked like this:


Since I didn't really trust my plaster walls in my apartment and just didn't want to put any more holes in the walls I decided to use Command Strips.


After the fact I realized I probably should have taken the time to carefully measure out where to hang them and use a level but for now I think they look pretty good.


Tuesday 6 March 2012

Chalkboard Paint Mugs

Here's another Pinterest project - diy chalkboard paint mugs. I saw this project in a couple of different variations so I tried two myself and one worked out well.

First, the supplies.
I found the mugs at the dollar store, of course $1 each. It made it easier not to worry about making a mistake when they were only a buck.
The chalkboard paint was $10 at Michaels, but I used a 40% off coupon so it came to about $6. The painter's tape and paintbrush I already had.

The first way I tried was just to make a strip of chalkboard paint in the middle of the mug. The second way was to paint the bottom half of the mug with chalkboard paint.


I did two coats on each mug, then immediately pulled the tape off. The strip around the middle of the mug turned out while the other mug didn't, probably because the tape wasn't stuck around it well. So I'm only going to show the one that did.


Then I used the chalk I also got at the dollar store and presto, the chalkboard paint works! I'm guessing that the chalkboard paint isn't dishwasher safe, but as I don't have a dishwasher myself it doesn't really matter to me. I will have to see how it goes when I wash the mug in the sink though.


I linked this post to The Tuesday Talent Show at Chef in Training

Monday 5 March 2012

Lemon Loaf

Last weekend I had guests over so I decided to step out of my comfort zone and try out a new recipe for a lemon loaf that I had found in the newspaper. It turned out well, and was actually fairly simple.


Lemon Loaf
1/2cup (125 ml) soft butter
1 cup (250 ml) granulated sugar
2 large eggs
1 Tbsp. (15 ml) finely grated lemonrind
11/2cups (375 ml) all-purpose flour
11/2tsp. (7 ml) baking powder
1/2tsp. (2 ml) salt
1/2cup (125 ml) milk2 Tbsp. (30 ml) lemon juice
Syrup:
1/3 cup (75 ml) granulated sugar
1/4 cup (60 ml) lemon juice

Directions:
Line 8-x 4-inch (1.5 L) loaf pan with parchment paper or grease; set aside. Heat oven to 350F.
In large bowl, beat butter until light and creamy. Beat in sugar until fluffy. Beat in eggs, one at a time, and lemon rind.In separate bowl, whisk together flour, baking powder and salt. Stir a third of these dry ingredients into butter mixture, followed by half of milk, half of remaining dry ingredients, then remaining milk and lemon juice and dry ingredients.
Scrape into prepared pan; smooth top. Tap smartly on counter to remove air bubbles. Bake in centre of oven until a skewer inserted into centre comes out clean, about 45 to 50 minutes. Let cool in pan on a rack for 10 minutes. With a skewer, make about 20 holes, evenly spaced and down to bottom of loaf.
To make the syrup, bring sugar and lemon juice to a boil, stirring to dissolve sugar. Boil for 1 minutes. Drizzle this syrup over cake, aiming frequently at holes. Let cool.


I linked this post to Made by you Monday on Skip to My Lou and Mix it up Monday on Flour Me With Love
Skip To My Lou
Mixitup

Thursday 23 February 2012

Banana Bread

Today I'm sharing another one of my go-to baking recipes for banana bread. I actually joined a couple of different ones I tried to get my own recipe that was delicious and, of course, simple.

Ingredients:
2 cups flour
1 teaspoon baking soda
1/4 teaspoon salt
1/2 cup butter
3/4 cup brown sugar
2 eggs
2 1/3 ups mashed overripe bananas
1/4 teaspoon cinnamon
1/4 teaspoon vanilla extract
(I didn't this time, but I have added a bag of chocolate chips before for an added treat!)

Preheat oven to 350 F. Lightly grease 9x5 loaf pan.
In bowl combine flour, baking soda and salt. In separate bowl mix butter and brown sugar. Stir in eggs and mashed bananas. Stir banana mixture into flour mixture and mix just to moisten. Pour batter into loaf pan and make for 60 minutes or until toothpick comes out clean from centre. Let bread cool for 10 minutes in pan.

Wednesday 22 February 2012

Clothespin Magnets

This project came to be when I found some super cute clothespins at Michaels for $1. I didn't need them for their normal use - hanging clothes on a clothesline - but I could see using them as magnets on the fridge.
The search for magnets was on. I looked at Michaels and found some magnet strips for $6 which seemed a little on the expensive side. At the dollar store I found two options but both were too big to fit on the clothespins. Finally at Wal Mart I found similar strips to the ones at Michaels for $4 so I got those.


I cut the strips in half and then trimmed them from the end so they would fit on them magnets. Then I pulled off the backing and stuck them on. I only had 4 clothespins so I only needed 2 of the strips.


And presto! 4 clothespin magnets!

Tuesday 21 February 2012

Chicken and Broccoli Casserole

This long weekend I spent most of my time split between watching episodes of Downton Abbey and working on a scrapbook for my niece's first birthday. But I also squeezed in a little time to do some baking and cooking. One recipe I made was this chicken and broccoli casserole. It is really quick and easy and of course delicious! It is an old family favourite that I love to make now that I'm on my own because it brings back memories of family dinners back home.


Chicken and Broccoli Casserole

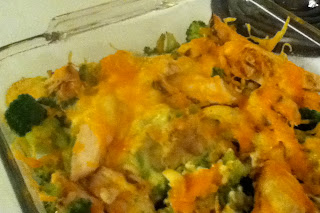
1 lb chopped broccoli

2 cups cooked chicken

2 cans cream of chicken soup

2/3 cup mayo

1 ½ tbsp lemon juice

½ tsp curry powder

1 ½ tbsp cornstarch

½ cup cheddar cheese

Cook broccoli for a few minutes, drain and place on bottom of greased 9x13. Place chicken on top. Mix soup, mayo, juice, curry and cornstarch and pour over. Sprinkle grated cheddar cheese over. Bake uncovered at 350ยบ for 30 minutes. Serve over rice.

I like to use a bag of frozen broccoli and then i skip the first step of cooking the broccoli for a few minutes. Also, because I'm only cooking for one I like to make a whole pan and then make a serving of 5 minute rice. Then I store the left overs in the fridge or freezer and just make a personal serving of rice each time I want some.


I linked this post to the Tuesday Talent Show at Chef in Training

Friday 10 February 2012

The House Across the Street

I live across from a very beautiful house. It is a large, old stone house with many beautiful architectural features.
This three story mansion sits on a slight hill, giving it a slight air over the neighborhood. When I come home in the
late evening the house across the street is all light up from the inside. Pulling onto my street and seeing this
beautiful sight gives me a warm and safe feeling, like it is looking out for me.
In the winter mornings when I look out my window and I see the house across the street I am a little less upset that I
have to go out to shovel because I am blessed by seeing such a picture-perfect sight across the street.
Living in the downtown area of my town has exposed me to plenty of beautiful old homes. Of course I am unable to afford
to own one of this historic houses, let alone rent one, I am satisfied to simply live in my humble home across the
street from one of the best and brightest homes in the neighborhood.
Thank you to my neighbors for living in and keeping up such a beautiful home. It is such a nice feeling to live even
near such a house as yours. And thank you for providing such wonderful inspiration for maintaining my own home.

Monday 30 January 2012

Chocolate Chip Cookies

Yesterday afternoon I spent some time in the kitchen making a batch of chocolate chip cookies. The recipe I used is one I got a couple years ago from my sister and I've been using it faithfully ever since. It's easy, quick and most importantly provides delicious results!


Chocolate Chip Cookies

3/4 cup sugar
3/4 cup brown sugar
1 cup butter, softened
1 tsp vanilla
1 large egg
2 1/4 cup flour
1 tsp baking soda
1/2 tsp salt
1 bag (12 ou
nces) semisweet chocolate chips (for this batch I used chocolate chucks, yum!)

Heat oven to 375F. Beat sugars, butter, vanilla and egg in large bowl with electic mixer on medium speed, or mix with spoon. Stir in flour, baking soda, and salt (dough will be stiff) stir in chocolate chips.

Drop dough by rounded tablespoonfuls about 2 inches apart onto cookie sheet.

Bake for 7-10 minutes or until light borwn (centres will be soft). Cool for 1-2 minutes then transfer to wire rack.

Hope you enjoy!


Sunday 22 January 2012

The Gift of Snow

Since I live in the part of the world, Canada, that does happen to get snow in the winter, it means I often have to spend some extra time before I go to work in the mornings scrapping off my car and shovelling my sidewalk and driveway.
When I was younger snow meant bundling up in snow gear and playing outside with my sisters. We built forts, threw snowballs and got to go sledding.
But something changed a couple years ago when I went off to college. The first year I stayed in a dorm which was connected to the main building so I never really noticed when it snowed. The second year though I moved into a basement apartment and had to walk and take the bus. Then I started understanding why most adults can't stand the snow. And now that I'm living in a place with a driveway and sidewalk I'm responsible for clearing off and I have to drive on the snowy and icy roads, I'm really becoming resentful of the winter weather conditions.
It is hard not to get a little grumpy when you have to work outside in the 10 below zero weather and shovel off five centimetres of snow.
Instead I'm trying this winter to look at snow as a gift. Snow is a gift because it gives me a few minutes to get outside and breath in the fresh air and do some free exercise. No paying for a gym membership for me, I can just go outside and pick up my shovel. Snow is a gift that allows me some time alone with my thoughts where I can clear my head and appreciate the silence. Snow is a gift that allows me the chance to wonder and marvel at God's world and the beauty of creation. Fresh snow covering the ground, trees and neighbouring houses always paints a beautiful, perfect picture.
So thank you God, for the gift of snow, and help me to continue to appreciate it this winter.

Monday 16 January 2012

Weekend Wreath Project

This weekend I tackled a small wreath project.
My inspiration came from here: http://teachcraftlove.blogspot.com/2010/06/front-door-wreaths_22.html. Actually I found the photo on Pinterest, a website I have been spending too much time on lately!

All of my supplies came from my local Michaels craft store. Here's the break down on the cost:
wreath - $3.99
white carnations - 3@ $0.89
blue flowers - $1.99
Wooden #1 - $0.05
Wooden #8 - $0.05
Wooden #0 - $2.49
Total - 11.29

Here is what everything looked like before:


It was overall pretty quick and simple. First I cut off the stems from the flowers and and kind of "dry" place them on the wreath without using glue to see how they would look.
Then I pulled out some white craft paint and a small sponge paint brush, both of which I got from the dollar store a while ago to paint the wooden numbers white.


I just gave them one quick coat. The paint covered the numbers well, but still gave it kind of a white-wash feel that I liked.
After giving them a couple hours to dry I broke out my little glue gun and glued the flowers and numbers in place.

Presto!

I really like how it turned out, now I just have to find the over-the-door wreath hanger I put away with all my Christmas decor.

I linked this post here: